Thursday, May 30, 2013

May 2013 Birchbox & Ipsy

May 2013 Birchbox (2)


As you may or may not know, I receive two Birchboxes every month. This month, I received two of the same box. This doesn't happen to me often, this is only the third time since adding a second account in June 2012. There was one slight difference in the two boxes, but I have only taken one picture since all the products were essentially the same.

Amika Obliphica Nourishing Hair Mask - Packed with omega acids and vitamin C, this lush conditioning mask boosts shine and even helps repair split ends. Sample Vaue: $1.60

Marvis Classic Mint Toothpaste - A stylish Italian import with an invigorating peppermint flavor. Sample Value: $1.40

COOLA Classic Face SPF 30 Cucumber Moisturizer for Face - This mineral sunblock is infused with organic anti-aging ingredients like evening primrose extract and borage seed oil. Sample Value: $4.33

Sumita Color Contrast Eyeliner (Suman - Black) - Inspired by traditional Indian formulas, this velvety liner glides on easily and lasts for hours. Mini Size Value: $5.25

Isaac Mizrahi FABULOUS Isaac Mizrahi Eau de Parfum - For his first scent, the designer created a fanciful blend of mandarin and jasmine laced with vanilla. Sample Value: $2.03

Birchbox Find: Acroball PureWhite hybrid ink pen (I received one that writes pink, and one that writes purple) - Vibrant ink colors and all the smoothness of a gel ink pen with none of the smudging or smearing. Comes in multiple shades. Value: $1.56

Box Cost: $10.00
Box Value: $16.17

Join Birchbox: My Referral Link

May 2013 Ipsy (2)


Ipsy had a change of format this month, with lots of fun bag variations. I decided to add a second account and try my luck at scoring two different bags. I ended up with a few duplicates, but just enough variation to be happy with.

Bag #1 (top)

Island Vanilla Perfume Roll-OnInspired by the unique magic of Tahitian vanilla, this sensual blend sets sweet and sultry vanilla absolute, with honey-jasmine notes and a touch of fruitiness, against a deep and beautiful base of tea. Full Size: $12.00

Zoya Nail Polish in Gie Gie (pink) Zoya Nail Polish in GeiGei can be best described as a full-coverage, blushing cherry blossom pink metallic. A shimmery light shade for an always-appropriate natural pink nail look. Originally created as a custom runway shade for fashion designer Zang Toi. Full Size: $8.00

Anastasia Clear Brow Gel This clear brow formula tames unruly brows without leaving them stiff, flaky or sticky. Sample Value: $6.68

Mirabella Colour Sheers Lipstick in PosyBeautifully sheer lip color to wear all day and night. Mango butter base nourishes lips. Full Size: $22.00

Yaby Concealer Refill in Buff - Full Size Refill Value: $4.85

Bag #1 Cost: $10.00
Bag #1 Value: $53.53

Join Ipsy: My Referral Link

Bag #2 (bottom)

Yaby Concealer Refill in HoneyFull Size Refill Value: $4.85

Mirabella Colour Sheers Lipstick in BellarinaBeautifully sheer lip color to wear all day and night. Mango butter base nourishes lips. Full Size: $22.00

Zoya Nail Polish in Gie Gie (pink) Zoya Nail Polish in GeiGei can be best described as a full-coverage, blushing cherry blossom pink metallic. A shimmery light shade for an always-appropriate natural pink nail look. Originally created as a custom runway shade for fashion designer Zang Toi. Full Size: $8.00

Island Vanilla Perfume Roll-OnInspired by the unique magic of Tahitian vanilla, this sensual blend sets sweet and sultry vanilla absolute, with honey-jasmine notes and a touch of fruitiness, against a deep and beautiful base of tea. Full Size: $12.00

St. Tropez One Night Only, Instant Glow Body Lotion This lightweight cream simply smooths on to give you an instant, even, beautifully golden tan that will wash off whenever you choose. Sample Value: $6.08

Bag #2 Cost: $10.00
Bag #2 Value: $52.93

Join Ipsy: My Referral Link


Dazzling Monica


Above is two coats of Zoya Monica, followed by one layer of Zoya Armor Top Coat.


To that, I have used a piece of cosmetic wedge sponge to dab a bit of Sally Hansen Gem Crush Razzle Dazzler to the tips, and a bit down the nail.


A layer of Gelous gel top coat helps to smooth out the rough glitter, and after 24 hours I will seal the manicure with a coat of Seche Vite. Seche Vite does not mesh well with Zoya polishes, so it is important to only use it after the Zoya has had plenty of time to cure.

Products Used:
One coat Beauty Secrets Moisturizing Base Coat
Two coats Zoya Monica
One coat Zoya Armor Top Coat
Sally Hansen Gem Crush Razzle Dazzler
One coat Gelous Advanced Gel Top Coat
One coat Seche Vite Top Coat (after 24 hours)


Thursday, May 23, 2013

Diamond Studded

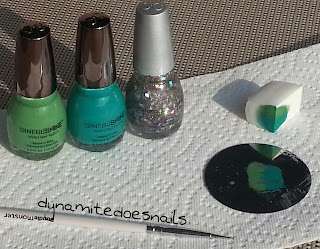
Today's manicure begins with a gradient of Sinful Shine My Kryptonite and Sinful Shine In The Limelight.


These are the steps I use to create a gradient. *Normally, I will paint one coat of the lightest color that the gradient will contain as a base color for the gradient polishes to grab on to (or a coat of white for a neon gradient). This time, however, I forgot to start with a base color, doh!, and just started with plain base coat.* Using the back of a metal stamping plate for a palette, I placed some Kryptonite and some In The Limelight next to each other. Taking a small piece of cosmetic wedge sponge (very lightly dampened with water and squeezed out), I dipped the sponge into both colors at once, and lightly dabbed it onto the nail keeping the lighter color toward the tips, and darker color toward the cuticle. Since I forgot the base color, the polishes didn't want to *grab*, and I had to repeat the dabbing 3 or 4 times for each nail (waiting a bit between dabs to let the polish dry) to reach desired opacity. I then added a layer of Seche Vite to smooth out the gradient.

Next, I used individual holographic glitter pieces from Sinful Colors Watch It Shine, stacked against each other to create a wavy pattern down the length of the nail.


For this step, I used the 'water marbling tool' from my Bundle Monster Nail Art Kit to fish the glitters from the bottle and place them in a stacked design. This was not as tedious as I had thought it would be, it took maybe 5 minutes to complete each hand. 


The diamond glitters have lots of pointy sharp edges, so it took 3 or 4 coats of Gelous gel top coat to smooth them out completely. When applying the Gelous, I kept it concentrated to the strip of glitter, rather than covering the entire nail with each coat. When they were fully smoothed over, I finished the manicure with a layer of Seche Vite top coat.

Below is a picture of the polish and materials used for this design, minus base and top coat.


Products Used:
One coat Beauty Secrets Moisturizing Base Coat
Gradient of Sinful Shine My Kryptonite and In The Limelight
One coat Seche Vite Top Coat
Glitter accents from Sinful Colors Watch It Shine
Four coats Gelous Advanced Gel Top Coat (Concentrated to the strip of glitter)
One coat Seche Vite Top Coat


Sunday, May 19, 2013

Cookies & Cream

This manicure begins with two coats of Zoya Carey


Then, I spaced out and put a layer of Seche Vite on top....forgetting that Seche makes Zoya shrink back from the tips and sides, doh! Normally, when doing a glitter mani, I'll lay the glitter right on the color with no top coat in between. However, I did the the color last night and the glitter today...so I needed to have a top coat for overnight, and just grabbed Seche cause it's my fave! Shrinkage was minimal this time, thankfully.

Anyway...today I added the glitter, two coats of Hard Candy Sugar Rush.


I then added one layer of Gelous top coat to smooth out the glitter, and ended with a coat of Seche Vite.


This manicure reminded me of Hershey's Cookies & Cream Chocolate Bars!


Products Used:
One coat Beauty Secrets Moisturizing Base Coat
Two coats Zoya Carey
One coat Seche Vite Top Coat (Oops, Zoya doesn't mix with Seche!)
Two coats Hard Candy Sugar Rush
One coat Gelous Advanced Gel Top Coat
One coat Seche Vite (OK to use over Zoya after it dries for 24 hours, and over glitter that is over Zoya that is dry.)


Saturday, May 18, 2013

Raging Rock Stars

I created this manicure for a Will Hoge rock show Thursday night. I wanted something bright and fun, with a musical design. *Bonus pics from the show at the bottom!*


The base color is two coats of Sinful Shine - All The Rage. Over that, I put a sparse layer of the glitter pictured above, Icing - Radio Superstar. 


I was somewhat disappointed as I flipped through the book I keep my stamping plates in, I thought I had more music related stamp designs. It turns out all I have are a few piano-type stamps, and this wavy musical design. I love the way this one turned out though, despite not having many to choose from. I must get more music stamps!


The stars are very hard to get from this this bottle of glitter polish, which ended up working out for me. After I placed the stamps, I fished out the stars and individually placed them onto the nails around the stamps with a dotting tool. (There is one star peeking out from the stamping on my pointer nail, it was the only one that came out naturally when applying the glitter. I left it where it lay, and I think the music pattern on top is pretty cute.)


The star glitter has some sharp edges at the points, so I went over the design with a coat of Gelous gel top coat to help smooth it out. If you look close at my ring finger nail, it is slightly smudged...I learned that Gelous will do this to your stamps if you aren't super-super careful. I know that now :/ lol. Over that, I applied a nice coat of Seche Vite and it *almost* smoothed everything out completely. I still had a few star points poking up which I could have solved with another layer of Seche Vite, but it didn't bother me enough to add another coat.

Products Used:
One coat Beauty Secrets Moisturizing Base Coat
Two coats Sinful Shine All The Rage
One coat Icing Radio Superstar
Stamping Plate M22
Konad Black Special Stamping Polish
One coat Gelous Advanced Gel Top Coat
One coat Seche Vite Top Coat

*Bonus pics from the Will Hoge show!*


Wednesday, May 15, 2013

Sinful Shine - All The Rage

All The Rage is the second color I have tried from the new Sinful Shine line of Gel Tech polishes. 


This is two coats of All The Rage, pictured with no topcoat. It really is very shiny on its own, just like they claim! 


I really like this color on me, and it's a great base for the design I did on top, Raging Rock Stars.


Sinful Shine - Bottoms Up Part-Two, Plus Zoya Natty Comparison

In my Sinful Shine - Bottoms Up Part-1 post, I said I was going to experiment with this new Sinful Colors formula and see how long it would last. I made it four whole days, and then had to change it out for a Raging Rock Stars design for a rock-and-roll show I am attending tonight. Here's what my left and right hands looked like at the end of four days of wear.


I applied the same base and top coat on both hands, the left with one coat of this color, and the right with two. Right away I noticed a difference in that the hand with one coat looked much nicer. It could be a fluke, I dunno....but I had some tip shrink right away on the right hand, and it wore unevenly. When I wear this color again, I'm going with the one coater. It held up amazingly over the course of 4 days, I'm really liking this new formula so far.

When I bought this color, I was thinking that it looked very similar to Zoya Natty, which I already owned. I bought it anyway, because I love this color, dupe or not! When I looked at them side by side, I realized that Natty is a deeper, darker shade of stormy blue. Bottoms Up is a bit brighter. Below is a comparison.


Sunday, May 12, 2013

Sinful Shine - Bottoms Up Part-1

A few days ago, a good friend of mine showed me an Instagram pic of what seemed to be several *new* Sinful Colors polishes, with shiny chrome-like caps, and a new name on the bottle. Being an avid collector of Sinful Colors, I was immediately intrigued! So yesterday while I was out, I stopped in at one of my fave Walgreen's to see if they had these mysterious new colors, and they had a whole new display with more new colors than I had expected! I limited myself to 5, for now, and this is the first one that I have tried so far.


Sinful Shine w/ Gel Tech - Bottoms Up


The new display claims that these new *gel type* formulas are 'more glossy than a patent leather shoe'. Years ago, I used to get gel manicures regularly, but this is the first *gel type* polish I have used from a bottle, that doesn't require a UV light to cure. So I decided to do an experiment to see how long and how well these polishes will last. 


On my Left hand, I have a base coat, one coat of Bottoms Up, and Seche Vite top coat. On my right hand, I have a base coat, two coats of Bottoms Up, and Seche Vite top coat. There two things I find interesting about this side-by-side comparison of both hands. One, is it just me or does the Left side just look *better* with just one coat? Two, the right side has a teeny bit of shrinkage, mostly obvious on my ring finger. I plan to wear these until there's noticeable chipping, I just hope that doesn't take *too* long haha.

Products Used:
One coat Beauty Secrets Moisturizing Base Coat
Left hand - One coat Sinful Shine Bottoms Up
Right hand - Two coats Sinful Shine Bottoms Up
One coat Seche Vite Top Coat

Wednesday, May 8, 2013

Sparkling Garbage Bubbles

I've been wearing Sparkling Garbage For Audrey for a few days, and today I decided to add some bubble stamps on top.


I used Konad special white stamping polish and stamping plate Mash-43 to create the bubbles, and sealed the design with one coat of Diamond Dry top coat.


Below is a collage of all three steps that create this manicure. China Glaze For Audrey on the left, For Audrey + Orly Sparkling Garbage in the middle, and For Audrey + Sparkling Garbage + Bubble stamps on the right.


Products Used for the Bubbles:
Konad Special White Stamping Polish
Mash Stamping Plate Mash-43
One coat Diamond Dry Top Coat Brilliance


Monday, May 6, 2013

Sparkling Garbage For Audrey

I'm a big fan of blue-green and holographic polishes. So when I walked past an Orly display the other day and spotted Sparkling Garbage, a lovely teal holo glitter, there was no question that it would be the newest addition to my collection.

Since Sparkling Garbage isn't quite opaque on its own, I chose to begin this manicure with two coats of China Glaze For Audrey.


Over that, I layered two coats of Orly Sparkling Garbage, and finished with a coat of Seche Vite top coat.


Polishes like these are infuriating to photograph, they never reveal their true beauty in pictures. Sparkling Garbage is densely packed with very fine holographic glitter that sparkles and shines in any light, and is especially breathtaking in direct sunlight. I tried and tried to capture the amazing holographic nature of this polish, just trust me that it is 100x more stunning in person! Below I have added a shot taken indoors with flash that shows a bit of what I'm attempting to describe. 


Products Used:
One coat Beauty Secrets Moisturizing Base Coat
Two coats China Glaze For Audrey
Two coats Orly Sparkling Garbage
One coat Seche Vite Top Coat


Saturday, May 4, 2013

LC's Black Tie

I've been loving the new Hard Candy Crystal Confetti Collection, so today I have another one to show you. This manicure begins with a base coat, two beautiful coats of Zoya LC, and one layer of Zoya Armor top coat. (Be sure to scroll past the before/after at the bottom of this post, for some bonus 'fail' footage.)


I followed that with one, very easy to apply, coat of Hard Candy Black Tie Optional. I just love all the different sizes and shapes of black and white glitter in this polish.


I then added one coat of Gelous gel top coat to smooth out the glitter, and finished with one more coat of Zoya Armor.


Products Used:
One coat Zoya Anchor Base Coat
Two coats Zoya LC
One coat Zoya Armor Top Coat
One coat Hard Candy Black Tie Optional
One coat Gelous Advanced Gel Top Coat
One coat Zoya Armor Top Coat

Bonus 'Fail' Footage


My good friend Soguesswhat11 posted a lovely manicure the other day that had a soft pink base, a metallic green wavy design all over, and red flower stamp accents. This was my attempt to recreate her design with my own twist, see her video tutorial here.

I chose two coats of Zoya Erika as my pink base color, Sinful Colors Moss Have and stamping plate Mash-50 for the vines, and Zoya LC and stamping plate Mash-28 for the flowers. 

In the end, I just didn't think it was as successful as I had hoped it would be. I love the base color, but perhaps should have chosen a darker or more vibrant green for the vines (Moss Have is the only metallic-ish green I own), and maybe a different flower stamp. It's OK, but it isn't a total win in my book. I'll have to give it another try someday!


Wednesday, May 1, 2013

Guest Post at Olive + Hazel's Blog!

Today, I have done a guest post for Jessica from Olive + Hazel, click here to check it out! I've created a cheery and bright stamping design, and all the details are there, including the before and after pic, and a bunch of great stamping tips. Don't forget to browse Jessica's blog and follow her while you are there, she has tons of great beauty reviews, subscription unboxings, nail looks, beauty deals, and more!