Showing posts with label sinful colors. Show all posts

Monday, January 6, 2014

Sea Glass by Starrily

A short time ago, Ipsy sampled some Starrily glitter polish in their monthly bag. Since Ipsy offers discount codes for the brands they feature in their bags, I  decided to use my discount to pick up some Starrily mini glitter polishes. 

This manicure began with two coats of Sinful Colors At Sea.


Over that, I added one coat of Starrily Sea Glass.


Sea Glass is different sizes of shredded blue glitter in a clear base.


Lastly, I sealed the manicure with two coats of Gelous gel top coat, and a coat of Seche Vite top coat. Later, I added an extra coat or two of top coat to the nails that had a few bits of glitter sticking up. For the most part, the glitter shreds were not very difficult to work with or make smooth.


Products Used

Sephora X Nail Cleanser
1 coat Nailtek Foundation 1
1 coat Sephora X Base Coat
2 coats Sinful Colors At Sea
1 coat Starrily Sea Glass
2 coats Gelous Advanced Gel Top Coat
1-2 coats Seche Vite Top Coat

Thursday, May 23, 2013

Diamond Studded

Today's manicure begins with a gradient of Sinful Shine My Kryptonite and Sinful Shine In The Limelight.


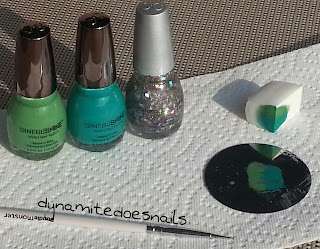
These are the steps I use to create a gradient. *Normally, I will paint one coat of the lightest color that the gradient will contain as a base color for the gradient polishes to grab on to (or a coat of white for a neon gradient). This time, however, I forgot to start with a base color, doh!, and just started with plain base coat.* Using the back of a metal stamping plate for a palette, I placed some Kryptonite and some In The Limelight next to each other. Taking a small piece of cosmetic wedge sponge (very lightly dampened with water and squeezed out), I dipped the sponge into both colors at once, and lightly dabbed it onto the nail keeping the lighter color toward the tips, and darker color toward the cuticle. Since I forgot the base color, the polishes didn't want to *grab*, and I had to repeat the dabbing 3 or 4 times for each nail (waiting a bit between dabs to let the polish dry) to reach desired opacity. I then added a layer of Seche Vite to smooth out the gradient.

Next, I used individual holographic glitter pieces from Sinful Colors Watch It Shine, stacked against each other to create a wavy pattern down the length of the nail.


For this step, I used the 'water marbling tool' from my Bundle Monster Nail Art Kit to fish the glitters from the bottle and place them in a stacked design. This was not as tedious as I had thought it would be, it took maybe 5 minutes to complete each hand. 


The diamond glitters have lots of pointy sharp edges, so it took 3 or 4 coats of Gelous gel top coat to smooth them out completely. When applying the Gelous, I kept it concentrated to the strip of glitter, rather than covering the entire nail with each coat. When they were fully smoothed over, I finished the manicure with a layer of Seche Vite top coat.

Below is a picture of the polish and materials used for this design, minus base and top coat.


Products Used:
One coat Beauty Secrets Moisturizing Base Coat
Gradient of Sinful Shine My Kryptonite and In The Limelight
One coat Seche Vite Top Coat
Glitter accents from Sinful Colors Watch It Shine
Four coats Gelous Advanced Gel Top Coat (Concentrated to the strip of glitter)
One coat Seche Vite Top Coat


Sunday, May 12, 2013

Sinful Shine - Bottoms Up Part-1

A few days ago, a good friend of mine showed me an Instagram pic of what seemed to be several *new* Sinful Colors polishes, with shiny chrome-like caps, and a new name on the bottle. Being an avid collector of Sinful Colors, I was immediately intrigued! So yesterday while I was out, I stopped in at one of my fave Walgreen's to see if they had these mysterious new colors, and they had a whole new display with more new colors than I had expected! I limited myself to 5, for now, and this is the first one that I have tried so far.


Sinful Shine w/ Gel Tech - Bottoms Up


The new display claims that these new *gel type* formulas are 'more glossy than a patent leather shoe'. Years ago, I used to get gel manicures regularly, but this is the first *gel type* polish I have used from a bottle, that doesn't require a UV light to cure. So I decided to do an experiment to see how long and how well these polishes will last. 


On my Left hand, I have a base coat, one coat of Bottoms Up, and Seche Vite top coat. On my right hand, I have a base coat, two coats of Bottoms Up, and Seche Vite top coat. There two things I find interesting about this side-by-side comparison of both hands. One, is it just me or does the Left side just look *better* with just one coat? Two, the right side has a teeny bit of shrinkage, mostly obvious on my ring finger. I plan to wear these until there's noticeable chipping, I just hope that doesn't take *too* long haha.

Products Used:
One coat Beauty Secrets Moisturizing Base Coat
Left hand - One coat Sinful Shine Bottoms Up
Right hand - Two coats Sinful Shine Bottoms Up
One coat Seche Vite Top Coat

Friday, April 26, 2013

Camouflage

Today's manicure started with a base coat, two layers of China Glaze Kalahari Kiss, and a coat of Seche Vite top coat.


Using the Mash-38 stamping plate, I stamped the camo design first with Sinful Colors Exotic Green, and then again with China Glaze Below Deck, so that the two stamps offset and overlapped each other on the nail.


You could do this with any colors and it would look great. Shades of blue, pink, or purple would make a cute camo too! I followed the stamps with another coat of Seche Vite to seal the design.


Products Used:
One coat Beauty Secrets Moisturizing Base Coat
Two coats China Glaze Kalahari Kiss
One coat Seche Vite Top Coat
Mash-38 Stamping Plate
Stamps in Sinful Colors Exotic green and China Glaze Below Deck
One coat Seche Vite Top Coat